Adding Swagger UI with JWT Authentication in asp.net web api
Introduction
Swagger allows you to describe the structure of your APIs so that machines can read them. The ability of APIs to describe their own structure is the root of all awesomeness in Swagger. Why is it so great? Well, by reading your API’s structure, we can automatically build beautiful and interactive API documentation. We can also automatically generate client libraries for your API in many languages and explore other possibilities like automated testing.
Swagger does not only allows you to do API documentation but you can also authorize each endpoint in the swagger doc. In this tutorial, I use JWT to authenticate and pass the token to the "api_key" field which gives you access to protected resources.
If you're not familiar with swagger, you should try checking out their website http://swagger.io/
Adding Swagger UI with JWT Authentication in asp.net web API
To authenticate your swagger using jwt tokens, you have to start by installing the swashbuckle NuGet package
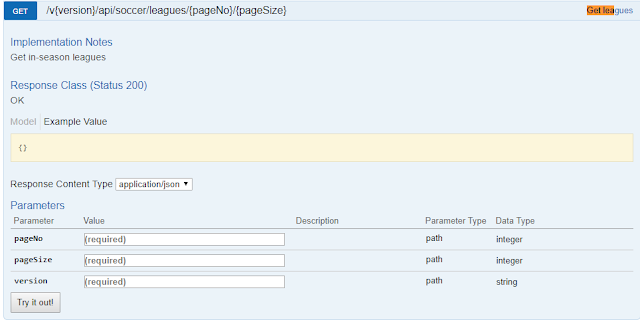
After installing the package, a SwaggerConfig file would be generated in the App_Start folder. The best way to get started using swagger dashboard quickly is to add comments to your API controller method. To add comments, start typing a triple forward slash above the method and visual studio would generate something like what is listed below:
/// <summary>
/// Get leagues
/// </summary>
/// <remarks>Get in-season leagues</remarks>
/// <param name="pageNo"></param>
/// <param name="pageSize"></param>
/// <returns></returns>
Adding comment would help to give more meaning to the swagger endpoints in the dashboard.
Authorization
Adding authorization is a simple process, you just have to make modification the the SwaggerConfig file in the App_Data folder by adding:
c.EnableApiKeySupport("Authorization", "header");
Then you can pass the token returned during authentication to the "API key" box in the dashboard and click on the Explore button. It would give you access to resources that require authorization.
If you haven't done anything on JWT before, you can check my previous post where i discussed about JWT authentication in asp.net web api.


You are writing some Amazing tips. This article really helped me a lot. Thanks for sharing this blog.
ReplyDeleteJabong Coupons